Friday, March 25, 2016

Papertrey March Blog Hop Challenge

It's the 25th of March and time for another Papertrey Ink Blog Hop Challenge. All of the inspirational photos can be seen on Nichole's blog hereIzziyana Suhaimi merges the art of embroidery with paper, and her designs are beautiful. Since I'm not into stitching or embroidery, this was a real challenge for me but Nichole always encourages us to just have fun. So, for the first time I used my new Make It Market Mini Kit: Color Pop Florals and started with a piece of the paper collection. It not only had a gray background but it was printed on PTI's signature white linen paper. Linen is fabric so that's close to stitching, right? Don't want to keep you here any longer as I know there will be lots of beautiful creations on this blog hop. Enjoy!


I so wanted to add twine, rhinestones or gems but didn't want to overdo it. Wink of Stella Glitter Pen was used on the centers of each flower, but it's hard to see in my photo. 


Supplies: (all PTI unless noted)

Cardstock: Stamper's Select White (base & frame) and MIM Mini Kit: Color Pop Florals
Ink: Summer Sunrise, Blueberry Sky, Enchanted Evening, Pure Poppy and Smokey Shadow
Stamps: MIM Mini Kit: Color Pop Florals and Graceful Greetings
Dies: Cover Plate: Pretty Frame
Other: MIM Mini Kit: Color Pop Florals Stencils, Sponge Daubers and WOS Glitter Pen
  

Wednesday, March 23, 2016

PTI MIM #243: Ink Blending Over Heat Embossing

So, all the hullabaloo is over after March's release, and now we're just waiting for more new goodies to arrive. Danielle Flanders shared her talents and Bloomin' Cute cards in a video on her blog as well as on Nichole's blog here. This week's Make It Monday Challenge is a technique using ink blending over heat embossing. It adds a whole different dimension to backgrounds or focal images. I'm remaining very optimistic that Spring is in the air, and that's why I used the beautiful sentiment from Tulip Time on this card.


Besides the two obvious black gems, I also adhered one to both "i's" in the sentiment. You might not be able to see this without enlarging the photo. I definitely plan to use this blending/embossing technique in the future because I really do like the added dimension. Thanks, Danielle, for sharing your talents with us!


Supplies: (all PTI unless noted)
Cardstock: Stamper's Select White
Ink: VersaMark, VersaFine Black Onyx, Pure Poppy, Bright Buttercup and Blueberry Sky
Stamps: Mum's The Word and Tulip Time
Dies: None
Other: Ink Blending Tool, White Embossing Powder, Black Gems (stash) and Corner Rounder


Friday, March 18, 2016

PTI Create Along With Us: March 2016

We are almost through the first quarter of 2016, and it's time for another Create Along With Us. The challenge here is to choose something the Design Team created during the release that inspired me. These gals just knock my socks off with their creativity every. single. month, and this one is no exception. Did you happen to see this one by Laurie Willison with her gorgeous ink blending?


IMG_2849
(source: Laurie)


I was also inspired with this card from Maile Belles. Not only did I love the design, but her color choices are quite unusual and very striking. Don't you agree?

(source: Maile)


This brings me to the card I created combining Laurie's design and Maile's color scheme. I also wanted to give credit to Kay Miller because she has several cards on her blog where she added dots or ink splatters around sentiments or images. The rest is history. Now here's my card. 


Supplies: (all PTI unless noted)
Cardstock: Stamper's Select White and SU Basic Gray
Ink: Lovely Lady, Raspberry Fizz and Smokey Shadow
Stamps: Graceful Greetings and Make It Market Mini Kit: Color Pop Florals
Dies: Make It Market Mini Kit: Color Pop Florals
Other: Ink Blending Tool, Gelly Roll Glitter Pen and SU Dimensionals

Wednesday, March 9, 2016

PTI MIM #242: Sponged Stamping

So, here we are again with another Make It Monday challenge at Papertrey Ink. This week the bright and cheerful Dawn McVey showed us how to use sponges to create a gradient ink blending on stamped images. Her two Spring Woods cards are fabulous, and you can see both of them as well as the video here. Can you believe I don't have birds or feathers in my collection, which would no doubt be quite popular for this sponged stamping technique?

In need of a milestone birthday card for a dear friend, I had to put my thinking cap on for ideas of what to use. Scene It: Celebration and Modern Background Stencils were calling my name. Without further ado, here's my card.


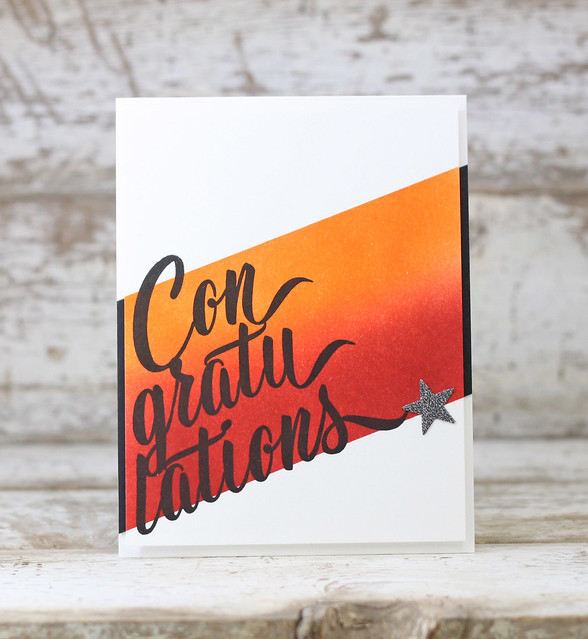
In the image below, you can see a close-up (click to enlarge it) of my sponged stamping and bling!


My Modern Stencil background was ink blended using Winter Wisteria, lightening up the edges. Two layers of Scene It: Celebration dies were cut, one in Winter Wisteria and one in Stamper's Select White. Here's where the sponged stamping technique comes in using Berry Sorbet and Bright Buttercup inks. Then I staggered that layer over the Winter Wisteria for a little different twist. The popped up Happy Birthday banner stamped in Berry Sorbert was cut separately from Stamper's Select White and edged with Bright Buttercup. The "75" was die-cut from Modern Numbers, dots added using a Gelly Roll Glitter Pen and popped up for dimension. Five purple rhinestones added a little sparkle to finish the card. 

I'm eager to see what others have created. Thanks in advance for stopping by, and I really do appreciate your comments. 


Supplies: (all PTI unless noted)
Cardstock: Stamper's Select White and Winter Wisteria
Ink: Berry Sorbet and Bright Buttercup
Stamps: Scene It: Celebration
Dies: Scene It: Celebration and Modern Numbers 
Other: Modern Background Stencils, Ink Blending Tool, Studio G Adhesive Gems, Gelly Roll Glitter Pen and SU Dimensionals


Friday, March 4, 2016

PTI MIM #241: Ombre Stenciled Backgrounds

It's time for another Make It Monday at Papertrey Ink. This week Betsy Veldman showed us how to obtain nice, even color using blending sponges and how to add some pattern using the new stencils. Her colorful and striking card showcases Tulip Time from PTI's February Release. Since I recently received my latest order from Papertrey, I had to take a stab at this technique so I'd know how to use the new Modern Background Stencils. Here's what I made and looking forward to more stenciling.


For the first time, I used white foam to add dimension to my "Cheers" die cut. Both the foam and glittered paper were run through my Xyron before die cutting to make it easier to adhere them to each other and also to my card. It was a little tricky because of the delicate word die, but probably still easier than adding foam tape. The black strip of paper with the white embossed sentiment is also raised up, but for this I used SU Dimensionals.  Now I remember why I seldom use white embossing powder on black card stock because no matter how I "prepare" the paper, the powder tends to stick where nothing has been stamped. The twine bow and three pink adhesive gems finished my card. 


Supplies: (all PTI unless noted)
Cardstock: Stamper's Select White, Silver Glittered (Joann's) and Black (stash)
Ink: VersaMark, Hibiscus Burst, Autumn Rose and Scarlet Jewel
Stamps: Keep It Simple: Birthday
Dies: Tag Sale #9, Uncorked Words and MFT Stitched Rectangles
Other: White EP, Twinery Twine, Studio G Adhesive Gems, White Foam, Modern Background Stencils, Ink Blending Tool, Xyron and SU Dimensionals