Showing posts with label Modern Background Stencils. Show all posts

Sunday, April 30, 2017

PTI MIM #282: Stenciled Watercolor Backgrounds and SSS Monday Challenge

Betsy is up this week for Papertrey Ink's Make It Monday showing us how to use stencils for watercolored backgrounds. Her card is just gorgeous, and I love the colors she used. But, I had to be a bit different as I set out to make a card for my grandniece's 12th birthday. (Note to self: I need more stencils with designs that flow like Woodblock Prints.) This is what I created. 


I will also be entering this in Simon Says Stamp Monday Challenge: We've Got Your Number. 


Thanks for stopping by, and I really do appreciate your comments. 


Supplies: (all PTI unless noted)

Cardstock: Stamper's Select White, Mint Julep, Hibiscus Burst, Hawaiian Shores and SU Summer Sun
Ink: Hibiscus Burst, Hawaiian Shores, Mint Julep and Summer Sunrise
Stamps: None
Dies: Big Basics: Wish Big and Modern Numbers Die
Other: Cover Plate: Pretty Frame, Modern Background Stencils, Paintbrush, Spray Adhesive and SU Dimensionals

Saturday, July 2, 2016

PTI MIM #254: Stenciling with Texture Paste

Ashley wanted us to get a little messy this week by participating in her Papertrey Ink Make It Monday challenge: Stenciling with Texture Paste. My stencil supply is a bit limited, but I just had to attempt this so once again I'm using Modern Background Stencils. It's a busy weekend in the USA with the 4th of July just around the corner so I'll keep this short.


It's a little cloudy here this morning. Can you tell? Even though it took me two days to complete allowing the texture paste to dry, I do like it. The most challenging for me was what sentiment to use, what color ink and where to place it. I combined New Leaf and Orange Zest for a fun Hello.

Thanks for stopping by, and I really do appreciate your comments!


Edited to Add:  Entering this in Simon Says Stamp Wednesday Challenge: Anything Goes.


Supplies: (all PTI unless noted)
Cardstock: Soft Stone and SU Pumpkin Pie
Ink: Limeade Ice, Hawaiian Shores, New Leaf and Orange Zest
Stamps: What The Doodle: Feather
Dies: None
Other: Modern Background Stencils (PTI), Crackled Texture Paste, Watercolor Brush, Gelly Roll Glitter Pen, Orange Rhinestone and Gray Ink Splatters (from my stash)


Sunday, June 26, 2016

PTI MIM # 253: Reverse Stenciling

Papertrey Ink's Make It Monday this week, Reverse Stenciling, is hosted by Betsy Veldman. She makes it sound so easy and suggests we grab a favorite stencil and a couple ink pads and play along. Here's her beautiful card.


Since I only have Modern Background Stencils and those from the Color Pops Floral kit, this is what I came up with using a brayer and Harvest Gold ink. Punched the four corners using SU's ticket corner punch, tied on some twine and popped up the Shaped Sayings: Birthday die cut before adhering it to a white card base using SU Dimensionals. I also splattered a bit of SU Taken With Teal using a marker & spritzer.


It isn't one of my favorites but turned out okay. Don't have time now to redo because we're on our way to Yellowstone for a little sightseeing.


Supplies: (all PTI unless noted)
Cardstock: Stamper's Select White and Tropical Teal
Ink: Harvest Gold
Stamps: None
Dies: Shaped Sayings: Birthday
Other: Modern Background Stencil, Twinery Twine, SU Spritzer, SU Taken With Teal Marker, SU Ticket Corner Punch and SU Dimensionals

Tuesday, June 14, 2016

Create Along With Us: June 2016

While the fabulous DT for Papertrey Ink showcases this month's new products, we get to play along using their projects as inspiration with links here on Nichole's blog. They come up with so many awesome creations that it's challenging to narrow down which ones to use. This is a great opportunity to challenge myself outside of my comfort zone and attempt something different. I've created two cards (but only one entry) as I was on a roll yesterday and actually finished five cards. This first card is a bit of a mix from Lizzie's Woodblock Prints (3rd one) beautiful rainbow card on the left and a spin off of Kay's Woodblock Prints (1st one) on the rightwith the bolder colors and white, layered die-cuts.
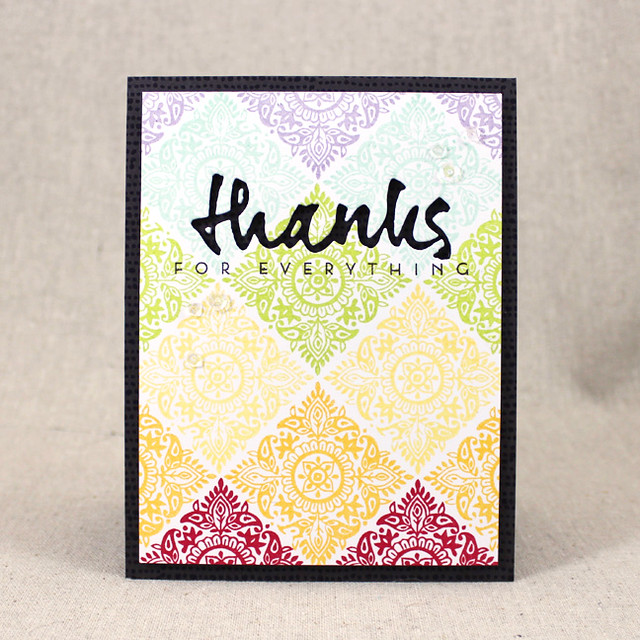

                        Thanks For Everything Card                  


Rarely do I take on the task of creating a background that needs to be more precise than random flowers and/or leaves, but this was a fun challenge for me. Thanks to my MISTI and Lovely Layers stamp set I was able to line it up pretty well. Even though I didn't use the exact same colors as Kay's lovely card above, I only substituted Royal Velvet for Simply Chartreuse as I thought it would be too much green for my design. If you look closely or enlarge this image, you can see I stamped "Big Hugs" in Royal Velvet beneath my three-layered, white "sending" die cut. Coordinating colored sequins finished it off after adhering it to a Summer Sunrise card base and rounding the two bottom corners.


Supplies: (all PTI unless noted)
Cardstock: Stamper's Select White and Summer Sunrise
Ink: Oranze Zest, New Leaf, Summer Sunrise, Tropical Teal, Royal Velvet and Raspberry Fizz
Stamps: Wet Paint Cuts III
Dies: Wet Paint Cuts III

Other: Corner Rounder, Sequins and SU Dimensionals


* * * * *

Here's my inspiration from Danielle's blog (also her 3rd card):


Thought it would be fun to try stenciling using two different colors separating a design. Since my stencil supply is limited to Modern Backgrounds and Color Pops Florals, I decided to create an oval mask for the center. The inks I blended are Mint Julep and Ocean Tides. I really like the combination but when it came time to choose the mat color, the Mint Julep ink coordinated better with Simply Chartreuse card stock. It really was a long shot against the Mint Julep card stock, at least in my opinion. Here's my take:


Thanks for stopping by, and I truly do appreciate your comments!


Supplies: (all PTI unless noted)
Cardstock: Stamper's Select White and Simply Chartreuse
Ink: Mint Julep, Ocean Tides and Pinefeather
Stamps: Graceful Greetings
Dies: None
Other: Modern Background Stencils, Oval Mask, Ink Blending Tool and SU Dimensionals

Friday, June 10, 2016

PTI MIM #252: Shadowing with Copic Markers

When I saw the title of this Papertrey Ink challenge, I figured I was out of the competition because I don't own one. single. Copic. But then, I read further about shadowing with markers so I was saved. Danielle recorded a great video on how to shadow word dies using a Copic marker. My word dies are limited for this technique so it was a bit more challenging because the letters are so much closer together.  Using a marker also doesn't show quite the shadow that Copics do, but I tried. First, I'll share Danielle's beautiful "Friends" card and then my "Thanks" one. Isn't her photography amazing?


For my card, I combined a few other techniques learned from previous Make It Monday Challenges and the fabulous Design Team. I heat embossed the stencil, the Mum and also dipped the leaves in Copper Embossing Powder. The mum and leaves are popped up using SU Dimensionals. If you enlarge the image, you can see my shadowing. Sequins finished the card front before rounding two corners, adhering a layer of Tropical Teal and then a Stamper's Select White card base. 


Appreciate you stopping by and thanks for your comments!


Supplies: (all PTI unless noted)
Cardstock: Stamper's Select White, Aqua Mist and Tropical Teal
Ink: Hawaiian Shores, Tropical Teal and VersaMark
Stamps: Mum's The Word
Dies: Modern Background Stencils, Mum's The Word and Uncorked Words
Other: SU Dimensionals, Copper Embossing Powder, SU Marker and Sequins (all from stash)


Wednesday, March 9, 2016

PTI MIM #242: Sponged Stamping

So, here we are again with another Make It Monday challenge at Papertrey Ink. This week the bright and cheerful Dawn McVey showed us how to use sponges to create a gradient ink blending on stamped images. Her two Spring Woods cards are fabulous, and you can see both of them as well as the video here. Can you believe I don't have birds or feathers in my collection, which would no doubt be quite popular for this sponged stamping technique?

In need of a milestone birthday card for a dear friend, I had to put my thinking cap on for ideas of what to use. Scene It: Celebration and Modern Background Stencils were calling my name. Without further ado, here's my card.


In the image below, you can see a close-up (click to enlarge it) of my sponged stamping and bling!


My Modern Stencil background was ink blended using Winter Wisteria, lightening up the edges. Two layers of Scene It: Celebration dies were cut, one in Winter Wisteria and one in Stamper's Select White. Here's where the sponged stamping technique comes in using Berry Sorbet and Bright Buttercup inks. Then I staggered that layer over the Winter Wisteria for a little different twist. The popped up Happy Birthday banner stamped in Berry Sorbert was cut separately from Stamper's Select White and edged with Bright Buttercup. The "75" was die-cut from Modern Numbers, dots added using a Gelly Roll Glitter Pen and popped up for dimension. Five purple rhinestones added a little sparkle to finish the card. 

I'm eager to see what others have created. Thanks in advance for stopping by, and I really do appreciate your comments. 


Supplies: (all PTI unless noted)
Cardstock: Stamper's Select White and Winter Wisteria
Ink: Berry Sorbet and Bright Buttercup
Stamps: Scene It: Celebration
Dies: Scene It: Celebration and Modern Numbers 
Other: Modern Background Stencils, Ink Blending Tool, Studio G Adhesive Gems, Gelly Roll Glitter Pen and SU Dimensionals


Friday, March 4, 2016

PTI MIM #241: Ombre Stenciled Backgrounds

It's time for another Make It Monday at Papertrey Ink. This week Betsy Veldman showed us how to obtain nice, even color using blending sponges and how to add some pattern using the new stencils. Her colorful and striking card showcases Tulip Time from PTI's February Release. Since I recently received my latest order from Papertrey, I had to take a stab at this technique so I'd know how to use the new Modern Background Stencils. Here's what I made and looking forward to more stenciling.


For the first time, I used white foam to add dimension to my "Cheers" die cut. Both the foam and glittered paper were run through my Xyron before die cutting to make it easier to adhere them to each other and also to my card. It was a little tricky because of the delicate word die, but probably still easier than adding foam tape. The black strip of paper with the white embossed sentiment is also raised up, but for this I used SU Dimensionals.  Now I remember why I seldom use white embossing powder on black card stock because no matter how I "prepare" the paper, the powder tends to stick where nothing has been stamped. The twine bow and three pink adhesive gems finished my card. 


Supplies: (all PTI unless noted)
Cardstock: Stamper's Select White, Silver Glittered (Joann's) and Black (stash)
Ink: VersaMark, Hibiscus Burst, Autumn Rose and Scarlet Jewel
Stamps: Keep It Simple: Birthday
Dies: Tag Sale #9, Uncorked Words and MFT Stitched Rectangles
Other: White EP, Twinery Twine, Studio G Adhesive Gems, White Foam, Modern Background Stencils, Ink Blending Tool, Xyron and SU Dimensionals