Friday, March 18, 2016

PTI Create Along With Us: March 2016

We are almost through the first quarter of 2016, and it's time for another Create Along With Us. The challenge here is to choose something the Design Team created during the release that inspired me. These gals just knock my socks off with their creativity every. single. month, and this one is no exception. Did you happen to see this one by Laurie Willison with her gorgeous ink blending?


IMG_2849
(source: Laurie)


I was also inspired with this card from Maile Belles. Not only did I love the design, but her color choices are quite unusual and very striking. Don't you agree?

(source: Maile)


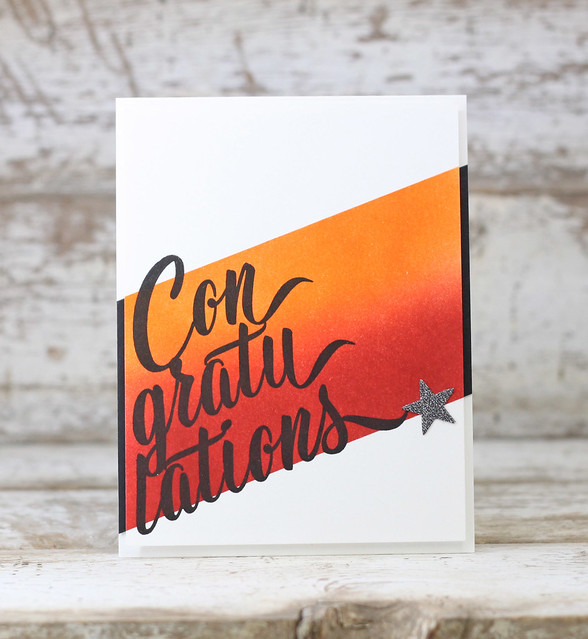
This brings me to the card I created combining Laurie's design and Maile's color scheme. I also wanted to give credit to Kay Miller because she has several cards on her blog where she added dots or ink splatters around sentiments or images. The rest is history. Now here's my card. 


Supplies: (all PTI unless noted)
Cardstock: Stamper's Select White and SU Basic Gray
Ink: Lovely Lady, Raspberry Fizz and Smokey Shadow
Stamps: Graceful Greetings and Make It Market Mini Kit: Color Pop Florals
Dies: Make It Market Mini Kit: Color Pop Florals
Other: Ink Blending Tool, Gelly Roll Glitter Pen and SU Dimensionals

Wednesday, March 9, 2016

PTI MIM #242: Sponged Stamping

So, here we are again with another Make It Monday challenge at Papertrey Ink. This week the bright and cheerful Dawn McVey showed us how to use sponges to create a gradient ink blending on stamped images. Her two Spring Woods cards are fabulous, and you can see both of them as well as the video here. Can you believe I don't have birds or feathers in my collection, which would no doubt be quite popular for this sponged stamping technique?

In need of a milestone birthday card for a dear friend, I had to put my thinking cap on for ideas of what to use. Scene It: Celebration and Modern Background Stencils were calling my name. Without further ado, here's my card.


In the image below, you can see a close-up (click to enlarge it) of my sponged stamping and bling!


My Modern Stencil background was ink blended using Winter Wisteria, lightening up the edges. Two layers of Scene It: Celebration dies were cut, one in Winter Wisteria and one in Stamper's Select White. Here's where the sponged stamping technique comes in using Berry Sorbet and Bright Buttercup inks. Then I staggered that layer over the Winter Wisteria for a little different twist. The popped up Happy Birthday banner stamped in Berry Sorbert was cut separately from Stamper's Select White and edged with Bright Buttercup. The "75" was die-cut from Modern Numbers, dots added using a Gelly Roll Glitter Pen and popped up for dimension. Five purple rhinestones added a little sparkle to finish the card. 

I'm eager to see what others have created. Thanks in advance for stopping by, and I really do appreciate your comments. 


Supplies: (all PTI unless noted)
Cardstock: Stamper's Select White and Winter Wisteria
Ink: Berry Sorbet and Bright Buttercup
Stamps: Scene It: Celebration
Dies: Scene It: Celebration and Modern Numbers 
Other: Modern Background Stencils, Ink Blending Tool, Studio G Adhesive Gems, Gelly Roll Glitter Pen and SU Dimensionals


Friday, March 4, 2016

PTI MIM #241: Ombre Stenciled Backgrounds

It's time for another Make It Monday at Papertrey Ink. This week Betsy Veldman showed us how to obtain nice, even color using blending sponges and how to add some pattern using the new stencils. Her colorful and striking card showcases Tulip Time from PTI's February Release. Since I recently received my latest order from Papertrey, I had to take a stab at this technique so I'd know how to use the new Modern Background Stencils. Here's what I made and looking forward to more stenciling.


For the first time, I used white foam to add dimension to my "Cheers" die cut. Both the foam and glittered paper were run through my Xyron before die cutting to make it easier to adhere them to each other and also to my card. It was a little tricky because of the delicate word die, but probably still easier than adding foam tape. The black strip of paper with the white embossed sentiment is also raised up, but for this I used SU Dimensionals.  Now I remember why I seldom use white embossing powder on black card stock because no matter how I "prepare" the paper, the powder tends to stick where nothing has been stamped. The twine bow and three pink adhesive gems finished my card. 


Supplies: (all PTI unless noted)
Cardstock: Stamper's Select White, Silver Glittered (Joann's) and Black (stash)
Ink: VersaMark, Hibiscus Burst, Autumn Rose and Scarlet Jewel
Stamps: Keep It Simple: Birthday
Dies: Tag Sale #9, Uncorked Words and MFT Stitched Rectangles
Other: White EP, Twinery Twine, Studio G Adhesive Gems, White Foam, Modern Background Stencils, Ink Blending Tool, Xyron and SU Dimensionals


Thursday, February 25, 2016

Papertrey February Blog Hop Challenge

Since I've been under the weather the past three weeks, I did not get a chance to seriously think about this month's Papertrey Ink Blog Hop image here and below, but I love the subtle pinks and greens. Today my DH underwent surgery for a right shoulder total replacement, which made for a long day. I'm squeezing in this challenge card and hope to comment tomorrow after I bring him home from the hospital. 


Because you have plenty of great eye candy, I'm going to keep this short. Besides, I need some rest. It's not one of my favorites, but it does qualifies for the Blog Hop challenge. It's difficult to see but I did stamp the leaf veins using Sweet Blush ink, with some green ink blending of Mint Julep and New Leaf. The sentiment, stamped in Black, was fussy cut and edged with Sweet Blush ink and popped up using SU Dimensionals. Some black rhinestones finished it off. 


Supplies: (all PTI unless noted)
Cardstock: Stamper's Select White and Sweet Blush
Ink: Sweet Blush, Mint Julep, New Leaf and VersaFine Black Onyx
Stamps: Harvest Berries and Graceful Greetings 
Dies: Harvest Berries
Other: Black Rhinestones and SU Dimensionals


Sunday, February 21, 2016

PTI MIM #239: Customizing Patterned Paper

Think I'm still recuperating from PTI's 9th Anniversary Celebrations. Have been under the weather ever since and patiently waiting for the arrival of my new goodies. However, Lizzie shared her Make It Monday video on Wednesday here with tips for sprucing up patterned papers with stamps. Other than a beautiful, colorful variety of Bitty Dots, my only other PTI patterned paper is the newer Pure Poppy+White Basics. Had a vision and finally felt well enough to push myself to craft. Here's my first Christmas card for 2016.


Even though it looks black, the dark layer of card stock is Pinefeather. To customize my patterned paper, I stamped the sentiment several times from Stylish Sentiments: Holiday in Pinefeather ink on a  die-cut circle, turning it into a Christmas ornament, which I popped up with SU Dimensionals.


Supplies: (all PTI unless noted)
Cardstock: Stamper's Select White and Pure Poppy+White Basics
Ink: Pinefeather
Stamps: Stylish Sentiments: Holiday 
Dies: Nesties Standard Circles, Large
Other: Perfect Pearls Mist, Silver Twine, Micro Glue Dot and SU Dimensionals

Sunday, February 14, 2016

PTI 9th Anniversary Day 10: Paper Crafting Alphabet


Ever heard of Paper Crafting Alphabet? Well, you have now as explained here by Nichole from Papertrey Ink. The challenge was to use anywhere from the first three to ALL of the letters in your first or last name. Write the letters in a single column on a piece of paper and use the chart on her blog as a reference for each letter. If you have a "double" letter, skip the duplicate letter and move onto the next letter in your name. Use your first or last name, depending on which one has a more interesting array of letters. If you want to keep things simple, use the first three letters of your name. If you want something more complex and challenging, use all of the letters in your name. Doesn't this sound like fun? Well, it was, and I will use this tool for years to come.

My letters worked out like this, and my card is below:

  • K = Kraft Card Stock
  • A = Add a border
  • T = Tie on some twine
  • H = Heat Emboss and image or sentiment
  • Y = Incorporate a shade of yellow
  • M = Mix together two stamp sets


The obvious is my Kraft card stock base. After heat embossing the stems from Botanical Silhouettes in white, I stamped the blooms using Summer Sunrise. Because it didn't show up too well, I restamped a couple times using my MISTI. Wanting them to shine, I also stamped in VersaMark and heat embossed those in clear. They actually appear more brown so my "incorporated yellow" is Harvest Gold for my add a border. To finish the card, I wrapped the front Kraft panel with white crochet thread/twine, attached a little "Thanks" and tied it off in a bow. The two stamp sets I used are: Botanical Silhouettes and Trendy Tree Tops. This wraps up 10 great days of challenges in honor of PTI's 9th Anniversary. What fun! Now I just hope I win one of the many gift certificates because my "want" list is very, very long and expensive. 


Supplies: (all PTI unless noted)

Cardstock: Kraft and Harvest Gold
Ink: VersaMark and Summer Sunrise
Stamps: Botanical Silhouettes and Trendy Tree Tops
Dies: None
Other: White & Clear Embossing Powders, SU Window Punch & 1/8" Circle Punch and White Crochet Thread

PTI 9th Anniversary Day 9: Saturday Snail Mail

The 9th day of PTI's 9th Anniversary brought another fun challenge here. We were to create a card for the A-M-A-Z-I-N-G warehouse staff at Papertrey Ink and mail it to them. In additon, they just started a new hashtag campaign, #saturdaysnailmail, for social media such as Instagram, Facebook and Twitter. I'll definitely mail the card and hope to post on Twitter as don't have Instagram or Facebook accounts. This will be an ongoing campaign for Saturdays. We'll see if I remember to do this in the future.

My card pretty much says it all as I truly do appreciate the PTI staff more than they know. They are always willing to respond to customer service inquiries and make things right, wrap and package our goodies safely and quickly, restock items as soon as possible and brightens our day when USPS or UPS drops by with a delivery. Thanks for another great year and look forward to many, many more!


Supplies: (all PTI unless noted)

Cardstock: Stamper's Select White, Enchanted Evening and New Leaf
Ink: Enchanted Evening
Stamps: Layered Banner Banter and Boutique Borders: Thanks
Dies: Edger #3 and Layered Banner Banter
Other: New Leaf Bitty Dot Paper, Corner Rounder and SU Dimensionals